Outdoor Entertaining Lighting: How to Layer Bistro, Path, and Accent Lights
Reading time: 14 minutes
Picture this: it’s a warm summer evening in 2026, your backyard is buzzing with friends and laughter, and the lighting transforms your outdoor space into something that feels like a rooftop restaurant in the south of France. That magical atmosphere? It’s not an accident. It’s the result of intentional, layered outdoor lighting design.
Yet most homeowners default to a single flood light bolted above the garage door and call it done. If that sounds familiar, you’re leaving enormous entertaining potential untapped. The difference between a forgettable backyard and a genuinely stunning outdoor living space often comes down to how you layer three core lighting types: bistro (string) lights, path lights, and accent lights.
This guide breaks down the exact strategy professional landscape designers use — without the five-figure budget. Whether you’re starting from scratch or rethinking a patio that never quite felt right, you’ll walk away with a concrete plan you can implement this weekend.
Table of Contents
- Why Layering Matters: The Three-Layer Framework
- Bistro Lights: Setting the Ambiance Above
- Path Lights: Guiding Guests Safely and Stylishly
- Accent Lights: The Details That Elevate Everything
- Planning Your Layout: Zone-by-Zone Approach
- Smart Lighting Technology in 2026
- 3 Common Mistakes (and How to Avoid Them)
- Lighting Type Comparison Table
- Frequently Asked Questions
- Light Up Your Space: Your Action Plan
Why Layering Matters: The Three-Layer Framework
Interior designers have long understood that great lighting requires layers — ambient, task, and accent. The same principle applies outdoors, but with an added dimension: safety. Outdoor lighting must simultaneously create atmosphere, guide movement, highlight focal points, and ensure guests don’t trip over the garden step on their way to the drinks table.
According to the American Lighting Association’s 2025 Outdoor Living Report, 78% of homeowners who invested in layered outdoor lighting reported using their outdoor spaces at least three times more frequently after the upgrade. More tellingly, 64% said the improvement exceeded the impact of other outdoor upgrades like new furniture or landscaping.
The three-layer outdoor lighting framework works like this:
- Layer 1 — Ambient/Social Light: Overhead or wide-spread lighting that establishes the overall mood. Bistro/string lights are the quintessential example.
- Layer 2 — Functional/Safety Light: Directional lighting that illuminates walkways, steps, and transitions between zones. Path lights lead this category.
- Layer 3 — Focal/Accent Light: Targeted illumination that draws the eye to architectural features, plants, water elements, or art. Accent lights, spotlights, and uplights do this work.
Think of these three layers like a well-composed photograph: ambient light is the exposure, path lights are the focus, and accent lights are the composition. Remove any one element and the image falls flat.
Bistro Lights: Setting the Ambiance Above
Bistro lights — also called string lights, café lights, or Edison bulb lights — are the single most transformative element you can add to an outdoor entertaining space. Strung overhead at the right height and spacing, they create an enclosure effect that makes even an open patio feel intimate and inviting.
Choosing the Right Bistro Lights for Your Space
In 2026, the market has evolved significantly beyond the plastic-socket string lights of a decade ago. Here’s what actually matters when selecting bistro lights:
- Bulb type: LED filament bulbs now dominate the market, offering the warm glow of traditional incandescent bulbs at 80–90% lower energy consumption. Look for a color temperature between 2200K and 2700K — this is the “warm white” range that flatters skin tones and creates a genuinely welcoming atmosphere.
- Cord material: Weather-resistant rubber or braided fabric cords significantly outlast basic plastic-coated versions. For permanent installations, look for IP65-rated fixtures minimum.
- Spacing: Bulbs spaced 12 to 18 inches apart on a cord provide consistent illumination without the disco-ball effect of tightly packed lights.
- Lumens: For entertaining purposes, aim for 40–60 lumens per bulb. Brighter isn’t better here — bistro lights create magic at lower intensities.
Installation Patterns That Actually Work
The way you hang bistro lights matters as much as which lights you choose. Three proven patterns work for most residential spaces:
The Canopy Pattern: Strings run parallel from one side of the space to the other, creating a ceiling-like effect. Ideal for rectangular patios. Mount lines every 2–3 feet apart for full coverage, hanging at roughly 8–10 feet above head height.
The V-Shape or Starburst Pattern: All strings radiate from a central point — often a pergola post or a dedicated pole — fanning outward to anchor points around the perimeter. Creates a dramatic, tent-like visual that works especially well for circular patios or irregular spaces.
The Perimeter Drape: A single or double strand follows the perimeter of your outdoor space, looping between anchor points. Lower in impact than full canopy coverage, but elegant and highly practical for smaller budgets or spaces.
Real-world example: Sarah and Marcus, homeowners in Austin, Texas, transformed a 400-square-foot concrete slab into a functional outdoor dining room in 2025 using the canopy pattern with four parallel strings of 25-foot strands hung between two custom 10-foot steel poles. Total cost: $340 in materials. The result was indistinguishable from a professional installation photographed for design publications.
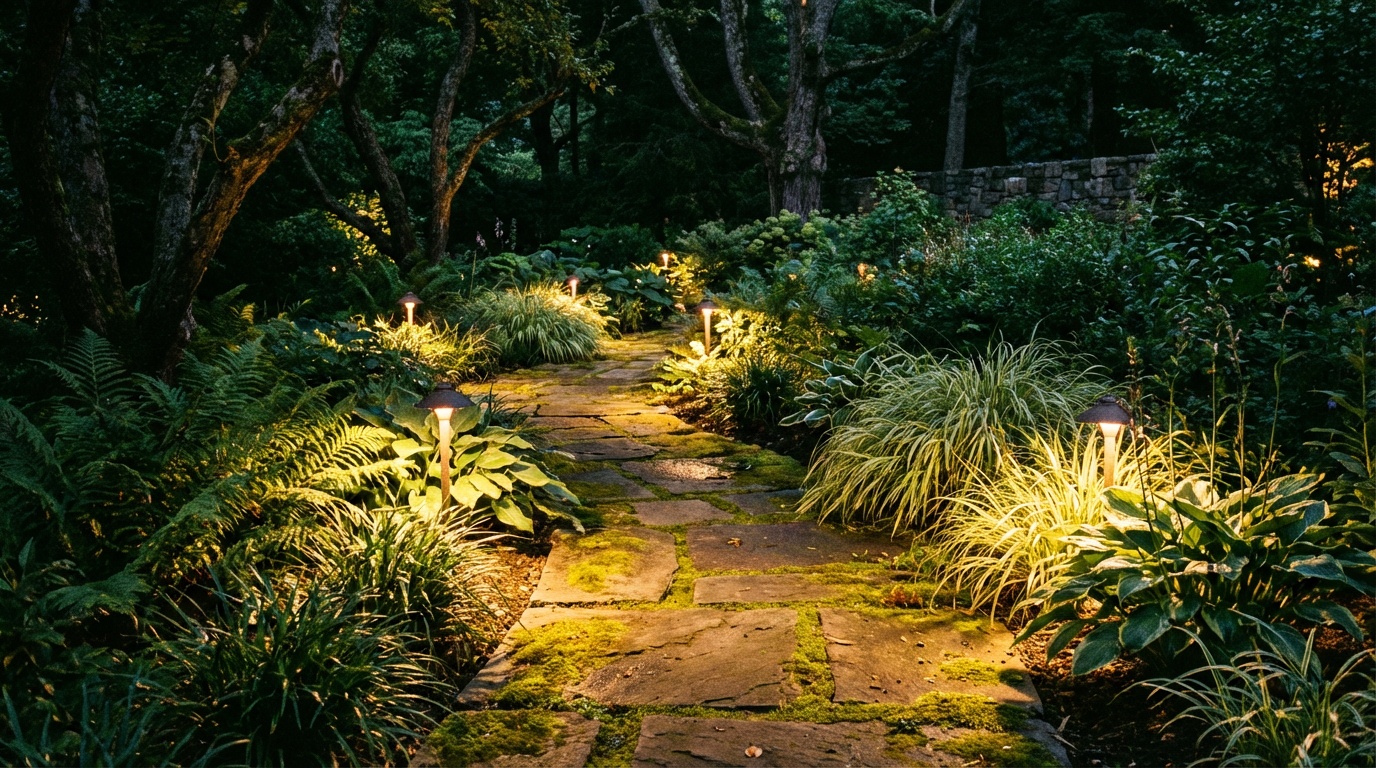
Path Lights: Guiding Guests Safely and Stylishly
Path lights are the unsung heroes of outdoor lighting design. Properly placed, they do three jobs simultaneously: prevent accidents, define the spatial boundaries of your outdoor zone, and contribute to the overall aesthetic composition.
According to the National Safety Council’s 2025 data, outdoor falls on residential properties account for over 2.1 million emergency room visits annually in the United States, with a significant proportion occurring at nighttime due to inadequate lighting. Path lights are your first line of defense against becoming a statistic.
Types of Path Lights Worth Knowing
The category has expanded considerably. Here are the primary options you’ll encounter:
- Traditional stake lights: The classic mushroom-cap or pagoda-shaped fixtures on stakes pushed into garden beds alongside pathways. Solar or low-voltage wired options are equally available.
- In-ground step lights: Recessed into the vertical face of deck steps or retaining walls. Extremely effective at illuminating level changes — one of the highest-risk areas for stumbles.
- Bollard lights: Taller, cylindrical fixtures (typically 18–36 inches high) that cast light both downward and sideways. More architectural in character; ideal for longer driveways or formal garden paths.
- Deck rail lighting: Integrated into the posts or rails of a deck structure. Provides a smooth, consistent light line rather than individual pools of illumination.
- Paver or hardscape-integrated lights: Set flush into pavers or stepping stones for a dramatic, modern effect. Requires professional installation but creates extraordinary results.
The Right Spacing Formula
A common mistake is placing path lights too close together, creating an “airport runway” effect that feels institutional rather than inviting. The professional rule of thumb: space path lights 6 to 8 feet apart along a typical walkway. The goal is pools of soft light with slight overlap — not a continuous ribbon of brightness.
For steps specifically, the rule changes: every step change of more than 4 inches should have dedicated illumination, whether from recessed step lights or a nearby stake light positioned to wash across the tread surface.
On curved pathways, offset lights alternately on either side of the path rather than placing them uniformly on one side. This creates visual rhythm and better illuminates the path center.
Accent Lights: The Details That Elevate Everything
If bistro lights set the mood and path lights provide safety, accent lights are what make your outdoor space feel designed rather than merely lit. They direct attention, create depth, and reward guests who look carefully at what surrounds them.
Upighting: Drama at Ground Level
Uplighting involves placing a light fixture at or near ground level and directing its beam upward — typically into a tree, along a wall, or under an architectural overhang. The technique borrows from theatrical lighting design and, when done well, is spectacularly effective.
A single well-placed uplight under a mature oak tree can transform your garden from “nice yard” to “landscape photograph.” Key considerations:
- Use narrow-beam spotlights (8–15 degree beam angle) for tight focal points like sculpture or specimen plants
- Use wide-beam floods (30–60 degrees) for washing larger surfaces like walls or hedge rows
- Warm white (2700K–3000K) uplighting flatters plants; cooler tones (3500K+) work better for stone and modern architecture
Downlighting: The Moonlight Effect
The inverse of uplighting, downlighting fixtures are positioned high — in trees, on pergola rafters, or on exterior walls — and directed downward. When installed in trees specifically, the technique is called moonlighting, because it replicates the dappled, directional quality of natural moonlight filtering through leaves.
Downlighting is exceptionally flattering for dining areas because the light falls naturally on faces and table settings rather than creating harsh upward shadows. If you have a mature tree adjacent to your dining zone, a single downlight fixture mounted 15–20 feet up can replace the need for overhead bistro lighting entirely in that zone.
Focal and Feature Lighting
Every outdoor entertaining space benefits from a focal point — a fire pit, a water feature, a piece of garden art, an unusual plant specimen. Accent lighting that frames or highlights these features does two things: it creates visual hierarchy that helps guests orient themselves in the space, and it gives people something beautiful to look at during those natural lulls in conversation.
For fire pits and fireplaces, supplementary accent lighting should be kept very subtle — the fire itself provides drama. Focus accent placement on the surrounding seating area or on plants just beyond the fire’s natural glow radius.
For water features, submersible LED fixtures placed directly in the water are the gold standard. In 2026, color-changing RGBW submersible fixtures have dropped dramatically in price and offer impressive control via smartphone app, allowing you to shift the mood of a fountain or pond from warm amber to cool blue with a tap.
Planning Your Layout: Zone-by-Zone Approach
Professional lighting designers think in zones rather than individual fixtures. Rather than asking “where should I put a light?” ask “what is this zone for, and what lighting serves that function?”
For a typical residential outdoor entertaining space, expect to define 3–5 zones:
- The Dining Zone: Primary social space. Needs warm ambient light (bistro canopy or pendant), sufficient brightness for comfortable eating (minimum 50–75 lux at table surface), and accent lighting to define boundaries.
- The Lounge/Fire Zone: Secondary gathering area. Lower light levels desired. Bistro perimeter strings, accent uplights on surrounding plants, and the fire itself provide all necessary illumination.
- The Transition/Pathway Zone: Circulation routes between dining, entry, and other zones. Path lights every 6–8 feet, step lighting at grade changes.
- The Garden/Landscape Zone: Background that frames the entertaining space. Uplighting on specimen plants and trees, subtle accent fixtures on architectural features.
- The Entry Zone: The first impression. Should be well-lit but not harsh. Path lighting plus a warm overhead fixture or well-placed downlight.
Once you’ve defined your zones, sketch a rough plan on paper — no artistic skill required, just circles and lines. Then walk the space at night with a flashlight, mimicking where the light would fall. This exercise almost always reveals unexpected problems (a shadow where guests will trip) and unexpected opportunities (a feature you hadn’t considered highlighting).
Smart Lighting Technology in 2026
The outdoor lighting category has seen remarkable technological advancement in recent years. In 2026, the following technologies are mainstream and accessible:
- Matter-compatible smart controllers: The Matter smart home standard, now widely adopted, means outdoor lighting from different manufacturers can be controlled through a single app or voice assistant without compatibility headaches. Systems from Lutron, Kasa, and Govee all work seamlessly within Matter ecosystems.
- AI-powered scene programming: Several lighting platforms now use AI to suggest scene programs based on calendar events, weather data, and past usage patterns. Your lights can automatically shift from “dinner party” mode to “end of evening” mode based on observed patterns.
- Solar-plus-battery path lights: The efficiency of 2026-generation solar path lights has dramatically improved over early iterations. Premium models from brands like Ring, Govee, and Philips Hue Calla now maintain consistent brightness for 12+ hours after a full charge, making them genuinely viable for entertainment-grade illumination rather than mere decorative novelty.
- Dynamic color temperature control: Tunable white fixtures allow you to shift from warm (2200K) to neutral (4000K) as needed — warmer during dinner, slightly brighter and cooler when clearing dishes or playing games.
A practical tip: even if you’re not ready to invest in a full smart ecosystem, run all your outdoor lighting through a single smart plug or outdoor smart switch. The ability to turn your entire outdoor lighting setup on or off — or set automated schedules — from your phone is a quality-of-life upgrade that costs under $30 and pays dividends immediately.
3 Common Mistakes (and How to Avoid Them)
Mistake 1: Going Too Bright
More light is not better light. Over-lit outdoor spaces feel harsh, uncomfortable, and frankly ugly. The most common culprit is flood lights with no dimming capability, blasting the space with 1000+ lumens when 200 would serve better. The fix: Always purchase dimmable fixtures and controllers, and resist the urge to run everything at full brightness. Test your space at 40% brightness before assuming you need to increase it.
Mistake 2: Ignoring the Transition Between Zones
Abrupt lighting changes — a brilliantly lit dining area adjacent to a completely dark garden — feel jarring and reduce your guests’ perceived safety. The fix: Use path lights and low-level accent fixtures to create a gradual brightness gradient from your most active zone outward. There should never be a hard line between light and dark in a well-designed outdoor space.
Mistake 3: Treating Solar and Wired as Interchangeable
Solar lights are convenient but have real limitations. They perform inconsistently in shaded locations, during cloudy stretches, or in winter months when daylight hours are short. Using solar fixtures in critical safety areas (steps, primary pathways) is a reliability risk. The fix: Use low-voltage wired lighting for safety-critical zones and primary entertaining areas; reserve solar for supplementary accent roles in well-lit garden beds or secondary pathways.
Lighting Type Comparison Table
| Lighting Type | Primary Function | Avg. Cost (2026) | Installation Difficulty | Best For |
|---|---|---|---|---|
| Bistro/String Lights | Ambient mood | $40–$200/strand | Easy (DIY) | Dining, lounge zones |
| Solar Path Lights | Safety/navigation | $8–$35/unit | Very Easy (stake) | Garden beds, secondary paths |
| Wired Low-Voltage Path | Safety/navigation | $20–$80/unit | Moderate (wiring) | Primary walkways, steps |
| Uplights/Spotlights | Accent/drama | $25–$120/unit | Moderate | Trees, walls, features |
| Submersible/Water Lights | Focal accent | $30–$150/unit | Easy–Moderate | Ponds, fountains, pools |
Usage Impact by Lighting Layer
Reported increase in outdoor space usage after adding each layer (2025 ALA Survey)
+52%
+31%
+38%
+65%
+78%
Frequently Asked Questions
How many lumens do I actually need for outdoor entertaining?
For a comfortable outdoor dining area, aim for 50–75 lux at table height — roughly equivalent to 40–60 lumens per bulb across a bistro string spaced at 12–18 inch intervals. Pathways need less: 10–20 lux is sufficient for safe navigation. The key principle is that outdoor entertaining spaces should feel dimmer than indoor spaces — eyes adapt to darkness, and overly bright exteriors are uncomfortable and kill the ambiance you’re working to create. When in doubt, install dimmable fixtures and experiment in real conditions rather than calculating to a fixed number.
Is solar-powered lighting good enough for a serious outdoor entertaining space?
Solar technology has improved dramatically, but it remains supplementary rather than primary for entertaining-grade applications. In 2026, premium solar path lights deliver reliable performance for garden bed and secondary path use — but they should not be your sole source of illumination for dining areas, steps, or high-traffic zones where consistent brightness is a safety requirement. The practical hybrid approach: use wired low-voltage lighting for your primary dining and safety zones, and supplement with solar fixtures in garden beds, along secondary paths, and in areas where running wire would be disruptive or cost-prohibitive.
What’s the most impactful single lighting upgrade for a modest budget?
If you can only do one thing, install bistro string lights over your primary outdoor gathering space. The transformation-per-dollar ratio is unmatched by any other single upgrade. A well-executed bistro light canopy over a dining area — achievable for $100–$300 in materials including poles if needed — will do more for your outdoor entertaining experience than $800 worth of mismatched path lights scattered without a plan. Once the bistro layer is in place, add path lights next (prioritizing steps and primary walkways), then layer in accent lighting as budget allows over subsequent seasons.
Light Up Your Space: Your Action Plan
You now have everything you need to approach outdoor lighting design the way professionals do — not as a collection of individual fixtures, but as a layered system where each element serves a deliberate purpose and reinforces the others.
Here’s your practical roadmap to get started this week:
- Walk your space at night (tonight). Take notes or photos of dark zones, awkward shadows, and areas where you or guests have stumbled. This is your real brief.
- Define your zones. Sketch a simple overhead diagram showing dining, lounge, transition, and garden zones. Label the primary function of each.
- Start with Layer 1 — bistro lights. Choose your pattern (canopy, V-shape, or perimeter drape), source your materials, and install over your primary entertaining zone. This is your highest-leverage first move.
- Add Layer 2 — path lights. Prioritize steps and primary walkways with wired low-voltage options. Fill in garden paths with solar fixtures. Space them 6–8 feet apart.
- Layer 3 — accents — comes last. Once your ambient and safety layers are functional, identify 2–3 focal points (a tree, a wall, a water feature) and invest in quality uplights or downlights for those specific targets.
As outdoor living continues its 2026 evolution — with homeowners increasingly treating exterior spaces as true extensions of the home rather than afterthoughts — the gap between a well-lit and poorly lit outdoor space will only widen in terms of property value, social enjoyment, and personal well-being. Research from the National Association of Realtors’ 2025 Outdoor Living Survey found that professionally designed outdoor lighting increased perceived home value by an average of 4.7% — a meaningful return on a relatively modest investment.
The straight talk? You don’t need a professional designer or a five-figure budget. You need a plan, a layering strategy, and the willingness to start with one strand of bistro lights and build from there. So here’s the question worth sitting with: What would your outdoor space look like — and what conversations would happen there — if it was lit the way it deserves to be?
Article reviewed by Sofia Romano, Flooring & Wall Tiling Geometry Specialist, on May 4, 2026