Outdoor Kitchen Planning: Ventilation and Gas Line Safety Requirements
Reading time: 14 minutes
You’ve envisioned it a hundred times: a sleek outdoor kitchen where weekend cookouts become legendary, where the sizzle of a perfectly seared steak mingles with laughter and summer air. But between that dream and a safe, code-compliant outdoor cooking space lies a critical layer of planning that most homeowners significantly underestimate — ventilation and gas line safety.
Here’s the straight talk: Skipping or shortchanging these two elements doesn’t just risk a failed inspection. It can put your family, your home, and your neighbors in genuine danger. In 2025, the National Fire Protection Association (NFPA) reported that outdoor cooking equipment was involved in an estimated 10,600 home fires annually in the U.S., with improper gas line installation and inadequate ventilation contributing to nearly 34% of those incidents. In 2026, updated building codes in over 22 states have tightened requirements for outdoor kitchen gas systems specifically — a clear signal that this is no longer a “nice to have” consideration.
This guide is your strategic roadmap through the complexity. Whether you’re a first-time outdoor kitchen builder or upgrading an existing setup, we’ll translate technical requirements into clear, actionable steps — so your outdoor kitchen is not only beautiful but bulletproof in terms of safety.
Table of Contents
- Why Ventilation and Gas Safety Actually Matter
- Ventilation Fundamentals: Covered vs. Open-Air Kitchens
- Gas Line Requirements: From Material to Installation
- 3 Common Mistakes and How to Avoid Them
- Real-World Examples and Case Studies
- Ventilation and Gas System Comparison Table
- Outdoor Kitchen Hazard Risk Chart
- Permits, Codes, and Inspections in 2026
- Frequently Asked Questions
- Your Safe Outdoor Kitchen: Final Steps
Why Ventilation and Gas Safety Actually Matter
Let’s start with a quick scenario. Imagine you’ve just installed a gorgeous pergola-covered outdoor kitchen. It’s got a six-burner commercial-grade grill, a side burner, and a pizza oven — all connected to a newly run gas line. You fire everything up for the first time during a backyard party. But within minutes, guests are coughing, eyes watering. Worse, carbon monoxide levels begin to climb undetected beneath the pergola’s roof. Nobody panics immediately because nobody can see the danger.
This isn’t a hypothetical horror story. It’s a composite of real incidents that home inspectors and fire safety officials document every year. The core problem? The homeowner treated the outdoor kitchen like an indoor kitchen — without understanding the fundamental differences in gas behavior and airflow dynamics in semi-enclosed outdoor spaces.
When you cook outdoors in a fully open space, wind naturally disperses combustion gases. But the moment you add a roof, walls, or even a densely planted hedge surrounding your kitchen zone, airflow becomes restricted. Gas appliances need adequate fresh air to combust properly. Without it, you risk:
- Carbon monoxide buildup — an odorless, colorless, and potentially lethal gas
- Gas accumulation from even minor leaks, creating explosion hazards
- Appliance malfunction caused by oxygen-depleted combustion environments
- Structural damage from heat and grease accumulation without proper exhaust
The financial stakes are equally real. In 2026, homeowner’s insurance policies in multiple states now explicitly require proof of code-compliant gas installation and ventilation documentation for outdoor kitchens. Without it, a claim related to an outdoor kitchen incident could be denied entirely.
Ventilation Fundamentals: Covered vs. Open-Air Kitchens
One of the most important distinctions in outdoor kitchen planning is understanding how your kitchen’s structure determines its ventilation needs. The rules aren’t one-size-fits-all — they scale with enclosure.
Open-Air Outdoor Kitchens
If your outdoor kitchen is fully exposed to the elements — no overhead roof, no surrounding walls — ventilation requirements are minimal by code. Natural wind currents handle dispersion of combustion gases effectively. However, even in these setups, thoughtful positioning matters. Your grill and burners should ideally be positioned so that prevailing wind direction pushes smoke and exhaust away from seating areas and any structures within 10 feet.
Pro Tip: Check your local wind rose data (available free through NOAA in 2026) to understand the dominant wind direction in your specific zip code before finalizing your outdoor kitchen layout. Positioning your cooking station upwind of your seating area and main house entry points is a simple optimization that dramatically improves air quality during cooking sessions.
Key considerations for open-air kitchens:
- Maintain a minimum 10-foot clearance from any combustible structure (NFPA 58, updated 2025 edition)
- Ensure grill hood vents face away from the home’s exterior walls
- Position propane tanks and gas equipment in well-ventilated areas — never in enclosed cabinets without approved ventilation cutouts
Covered and Semi-Enclosed Outdoor Kitchens
This is where things get genuinely complex — and where most homeowners run into trouble. A pergola, gazebo, solid patio cover, or screen enclosure all fall into the “covered” or “semi-enclosed” category, and each triggers additional ventilation requirements under the 2024 International Residential Code (IRC) and the 2025 NFPA 54 (National Fuel Gas Code).
The critical threshold to understand is the “three-sided enclosure rule.” If your outdoor kitchen is enclosed on three or more sides with a fixed roof, it is typically treated as an indoor-adjacent space for code purposes — requiring mechanical ventilation systems equivalent to commercial kitchen standards.
Specific requirements for covered kitchens include:
- Range Hood or Exhaust System: For any covered kitchen with gas appliances, a UL-listed range hood rated for outdoor use is strongly recommended and required in many jurisdictions. Look for hoods with a minimum CFM (cubic feet per minute) rating appropriate for your BTU output — the standard formula is 1 CFM per 100 BTUs of total appliance output.
- Makeup Air Provisions: Mechanical exhaust systems that move air out must have a corresponding makeup air source. In tightly enclosed spaces, a passive makeup air duct or active makeup air unit prevents negative pressure that can backdraft combustion gases into the space.
- Carbon Monoxide Detectors: The 2026 IRC update (adopted in 28 states as of Q1 2026) mandates CO detectors in any covered outdoor kitchen that contains gas appliances. These must be listed for outdoor use and rated to operate in temperature extremes.
- Clearance to Combustibles: Overhead structures must maintain a minimum clearance from cooking surfaces — typically 36 inches for combustible ceilings and 24 inches for non-combustible (always verify with your local AHJ — Authority Having Jurisdiction).
Choosing the Right Ventilation System
Not all outdoor hood systems are created equal. The two primary categories are island hoods (mounted above a central cooking island) and wall-mount hoods (installed against a wall or structure). For outdoor use, both must meet specific durability standards:
- Stainless steel construction (304 or 316 grade) for corrosion resistance
- Sealed motor assemblies rated for outdoor humidity and temperature variation
- Grease capture systems with easily cleanable filters
- CFM capacity that meets or exceeds your total BTU load calculation
In 2026, smart ventilation systems with auto-sensing capabilities — which activate automatically when cooking temperatures or CO levels rise — have become increasingly popular and cost-competitive, with entry-level smart outdoor hoods available in the $400–$800 range from brands like Blaze Outdoor Products and Summerset Professional Grills.
Gas Line Requirements: From Material to Installation
If ventilation is the lungs of your outdoor kitchen, the gas line is its circulatory system. Get it wrong, and the consequences can be catastrophic. Get it right, and you have a reliable, safe fuel source that can serve your outdoor kitchen for decades.
Natural Gas vs. Propane: Infrastructure Differences
Before diving into installation requirements, you need to understand the fundamental differences between the two primary fuel sources — because they have meaningfully different safety profiles in outdoor kitchen contexts.
Natural gas (methane) is lighter than air. In the event of a leak, it rises and disperses upward — which is actually favorable in open outdoor environments. It’s supplied through a permanent underground line connected to your municipal gas utility.
Propane is heavier than air. A propane leak will sink and pool in low areas — including the base of outdoor kitchen cabinets, nearby drains, or any below-grade features of your outdoor space. This property makes propane leaks particularly hazardous and is why propane-specific installation codes are stricter regarding enclosed cabinet ventilation and leak detection.
Key gas line material requirements under current 2025/2026 code standards:
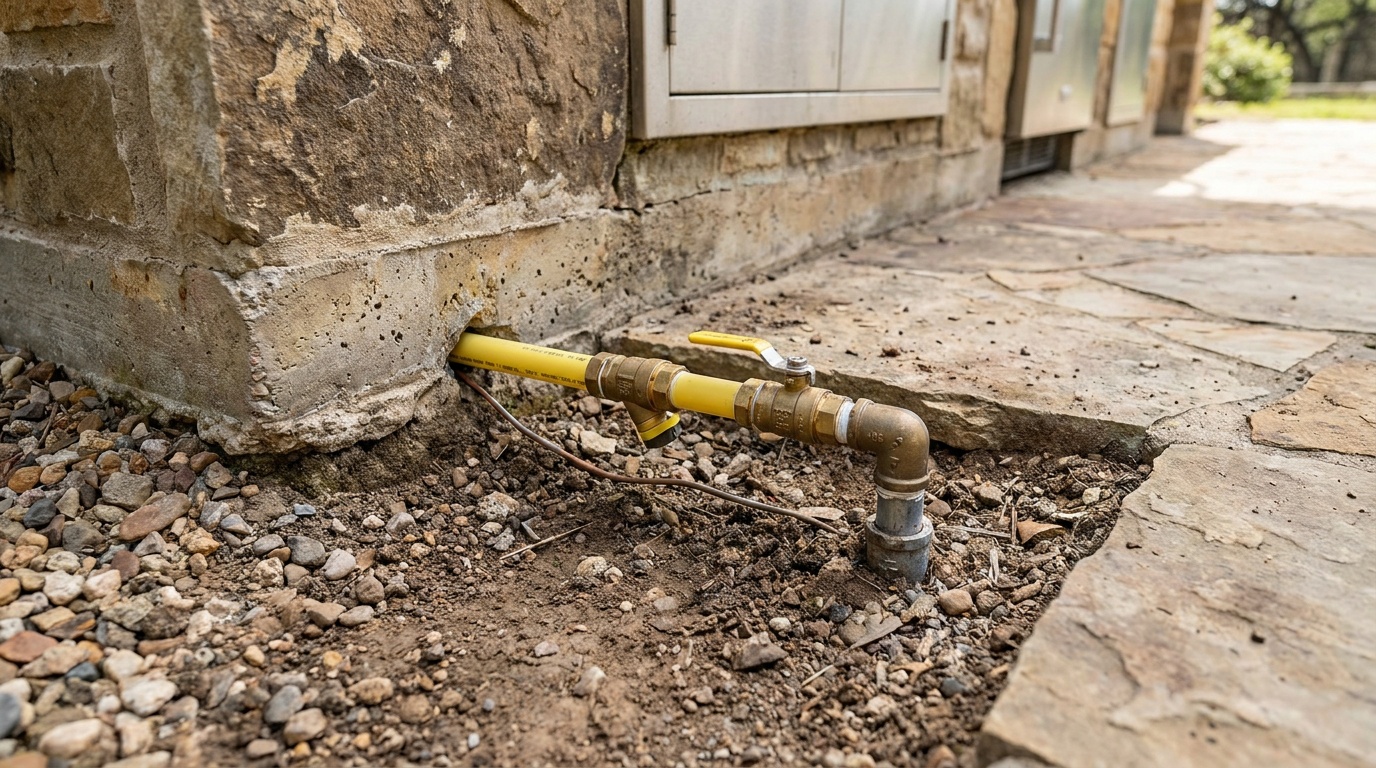
- Underground lines: Must use CSST (Corrugated Stainless Steel Tubing) with approved jacketing, or Schedule 40 black iron pipe. CSST must be bonded per NFPA 54 requirements to prevent lightning-induced damage.
- Above-ground exposed runs: Black iron pipe or approved rigid stainless steel. Flexible connectors (appliance connectors) are limited to 6 feet maximum length and must not be concealed inside fixed cabinetry.
- Burial depth: Outdoor gas lines must be buried a minimum of 12 inches below grade for protected areas, or 18 inches in areas subject to vehicular traffic, per NFPA 58 and IRC standards.
- Pressure testing: All new outdoor gas lines must be pressure tested to 1.5 times operating pressure before backfill or connection to appliances, with a documented hold period (typically 15 minutes minimum).
Shut-Off Valves and Emergency Access
One of the most overlooked elements of outdoor gas line planning is the accessibility and positioning of shut-off valves. Current code requires:
- A dedicated shut-off valve within 6 feet of each appliance, accessible without tools
- A master shut-off at the point where the gas line exits the house or utility meter
- All valves must be of the quarter-turn ball valve type (not gate valves) for reliable emergency operation
- Valves must be clearly labeled and accessible even when surrounding cabinetry is closed
Pro Tip: Install your outdoor kitchen’s gas shut-off valve in a position that can be reached from outside the kitchen footprint. In an emergency, you don’t want to have to reach across a hot grill or through smoke to shut off the gas supply.
Gas Line Sizing: The BTU Calculation
Undersized gas lines are a surprisingly common problem in DIY and even some professionally installed outdoor kitchens. When a gas line is too small for the collective BTU demand of all connected appliances, you experience pressure drop — appliances underperform, pilot lights blow out, and in extreme cases, combustion becomes incomplete and dangerous.
The sizing formula in simplified terms: Calculate the total BTU/hour demand of all appliances that might operate simultaneously, then use the pipe sizing tables in NFPA 54 (Appendix C) to determine the appropriate pipe diameter for your line length and pressure. When in doubt, size up — a larger pipe causes no performance problems, while an undersized line creates ongoing safety and performance issues.
3 Common Mistakes and How to Avoid Them
After reviewing dozens of outdoor kitchen builds and consulting with licensed gas contractors, three mistakes appear with striking consistency. Here’s how to recognize and sidestep each one.
Mistake #1: Using Indoor-Rated Components Outdoors
Indoor gas appliance connectors, indoor-rated range hoods, and standard CO detectors are frequently installed in outdoor kitchens by well-meaning but uninformed contractors or homeowners. Outdoor environments involve moisture, temperature swings, UV exposure, and insects — all of which degrade indoor components rapidly. By 2026, several major insurance carriers have added specific exclusions for damage caused by non-rated outdoor kitchen components. Always look for UL or CSA listings that specifically include outdoor ratings.
Mistake #2: Skipping the Permit Process
In a 2025 survey by the Home Improvement Research Institute, 41% of homeowners who completed outdoor kitchen projects admitted they didn’t pull the required permits. The reasons are predictable: permits cost money, cause delays, and feel like bureaucratic friction. But unpermitted gas work can void your homeowner’s insurance, create liability in the event of an incident, and result in expensive mandatory removal and reinstallation when you go to sell your home. In 2026, many municipalities have implemented digital permit tracking linked to property records — making unpermitted work easier to detect than ever before.
Mistake #3: Ignoring Propane Cabinet Ventilation
When propane tanks or gas components are housed in outdoor kitchen base cabinets, those cabinets must have ventilation openings at the bottom (since propane sinks). Many prefabricated outdoor kitchen kits either omit this or provide inadequate vent openings. The minimum requirement under NFPA 58 is ventilation openings with a combined area of at least one square inch per 1,000 BTU/hour of appliance input, with at least one vent opening within 12 inches of the cabinet floor. Verify this on any prefabricated system before purchase.
Real-World Examples and Case Studies
Case Study 1: The Covered Pergola Problem in Austin, Texas (2025)
A homeowner in Austin completed a $45,000 outdoor kitchen under a solid cedar pergola in late 2024. The installation included a 96,000 BTU grill, a side burner, and a pizza oven — totaling nearly 160,000 BTU of gas cooking capacity. No mechanical ventilation was installed because the pergola was “open on the sides.” Within three months of use, the family noticed persistent headaches during cooking sessions. An air quality assessment revealed elevated CO levels during simultaneous appliance use, particularly on calm-wind days when natural air movement was minimal. The remediation — adding a commercial-grade outdoor exhaust hood and makeup air system — cost an additional $6,200. The original contractor had no outdoor kitchen certification and was unaware of the applicable ventilation thresholds for high-BTU enclosed cooking setups.
Takeaway: Total BTU output matters enormously in covered spaces. Even partially open structures can create dangerous CO concentrations with high-output appliance combinations on low-wind days.
Case Study 2: The Right Way — A Build in Scottsdale, Arizona (2026)
A luxury outdoor kitchen project completed in Scottsdale in early 2026 offers a model example of best-practice gas and ventilation planning. The builder — a licensed outdoor kitchen specialist — began with a ventilation and gas load calculation before any structural work began. The kitchen featured a 72-inch built-in grill, a refrigerator, two side burners, and a warming drawer, all under a solid insulated aluminum patio cover. Key safety features included: a 1,200 CFM outdoor-rated exhaust hood with automatic fire suppression integration, CSST gas lines properly bonded and buried at 18-inch depth, individual quarter-turn shut-offs at each appliance, a smart CO/gas leak detector linked to a whole-home alert system, and a master shut-off accessible from outside the kitchen perimeter. The project passed a multi-stage city inspection on the first attempt and became a reference build for the municipality’s updated outdoor kitchen permitting guidelines.
Takeaway: Investing in proper engineering from the start — particularly for high-end builds — costs less than remediation and delivers a genuinely safer, more enjoyable outdoor kitchen experience.
Ventilation and Gas System Comparison Table
| Feature / Factor | Open-Air Kitchen | Covered Kitchen (Pergola) | Fully Enclosed (3+ Sides) |
|---|---|---|---|
| Mechanical Ventilation Required | No (natural airflow sufficient) | Recommended; required at high BTU | Yes — code mandated |
| CO Detector Requirement (2026 IRC) | Not required | Strongly recommended | Mandatory in 28+ states |
| Gas Cabinet Vent Openings | Required for propane systems | Required for propane systems | Required + enhanced sizing |
| Permit Complexity | Low to Moderate | Moderate to High | High — structural + mechanical |
| Typical Additional Safety Cost | $200 – $800 | $1,500 – $6,000 | $5,000 – $15,000+ |
Outdoor Kitchen Hazard Risk by Contributing Factor
The following chart illustrates the relative contribution of key risk factors to outdoor kitchen fire and safety incidents, based on 2025 NFPA and Consumer Product Safety Commission data.
Risk Contribution by Factor (% of reported incidents)
34%
28%
19%
12%
7%
Source: NFPA / CPSC composite data, 2025 reporting cycle
Permits, Codes, and Inspections in 2026
The regulatory landscape for outdoor kitchens has matured significantly in 2026. What was once a gray area — “it’s outside, so does it even need a permit?” — is now clearly addressed in most municipal building codes across the United States, Canada, and much of the EU.
In the U.S., the primary codes governing outdoor kitchen gas and ventilation include:
- NFPA 54 (National Fuel Gas Code), 2024/2025 Edition — governs all gas piping, connections, and appliance installations
- NFPA 58 (LP-Gas Code), 2024 Edition — specific requirements for propane systems
- International Residential Code (IRC) 2024 — structural, mechanical, and gas requirements for residential outdoor structures
- Local amendments — always check with your local AHJ, as states and municipalities can adopt stricter standards than the base model codes
A typical outdoor kitchen permit package in 2026 will require:
- Site plan showing kitchen location relative to the home and property lines
- Gas line routing plan with pipe sizes, materials, and burial depths
- Appliance schedule with BTU ratings
- Ventilation system specifications (CFM ratings, hood dimensions, exhaust termination point)
- Contractor license numbers for all gas and structural work
Expect 2–4 inspection stages: rough-in inspection (before burial of gas lines), gas pressure test inspection, mechanical/ventilation inspection, and final sign-off. Budget 2–6 weeks for permit processing in most jurisdictions, though many municipalities now offer expedited review for outdoor kitchen projects following the post-2024 boom in outdoor living construction.
“The best time to involve your local building department is before you finalize your kitchen design — not after,” says Mike Hendrix, a licensed mechanical contractor and outdoor kitchen specialist based in Charlotte, NC. “A 30-minute pre-application meeting can save you thousands in redesign costs and months of delays.”
Frequently Asked Questions
Do I need a permit for an outdoor kitchen gas line if I’m just using propane tanks instead of a permanent connection?
In most jurisdictions, portable propane cylinder connections (20 lb or smaller tanks used as-is) don’t require a permit. However, if you’re running a permanent gas line — even to a large portable cylinder or a built-in tank storage system — a permit is typically required. Additionally, if your outdoor kitchen is under any form of permanent roof structure, many municipalities require a permit for the structure itself regardless of fuel type. Always confirm with your local building department before starting work.
What CFM rating do I need for an outdoor kitchen range hood?
The general rule is to calculate 1 CFM per 100 BTU/hour of total appliance output. For example, a 60,000 BTU grill and a 15,000 BTU side burner total 75,000 BTU/hour, requiring a minimum 750 CFM hood. For covered or partially enclosed spaces, many professionals recommend adding a 25–30% safety margin — so 950–975 CFM in this example. Also factor in whether your hood is ducted to the exterior (always preferred) or recirculating (generally insufficient for gas appliances in enclosed outdoor spaces).
Can I install my outdoor kitchen gas line myself, or does it require a licensed professional?
In the vast majority of U.S. states and Canadian provinces, gas line installation requires a licensed gas fitter or plumber with gas certification. Self-installation is illegal in most jurisdictions and will result in a failed inspection, potential fines, and voided insurance coverage. Even in states where unlicensed homeowner gas work is technically permitted under specific conditions, the complexity of proper sizing, pressure testing, and bonding requirements makes professional installation strongly advisable. The cost of professional installation — typically $500 to $2,500 for a standard outdoor kitchen gas line run — is a small fraction of the potential cost of an incident or failed inspection remediation.
Building It Right: Your Outdoor Kitchen Safety Action Plan
Here’s what it all comes down to: A truly great outdoor kitchen isn’t just about premium appliances and gorgeous countertops. It’s about creating a space where you can cook confidently, host generously, and never worry about the infrastructure beneath the surface. Safety and quality aren’t trade-offs — they’re the same investment.
As outdoor living construction continues its upward trajectory (the outdoor kitchen market is projected to exceed $18 billion globally by 2027), the standards around safety are only going to tighten. Getting ahead of those standards now protects your investment and your family.
Your immediate action steps:
- Classify your kitchen type — open-air, covered, or enclosed — and identify which ventilation tier applies to your design before finalizing any layout decisions.
- Calculate your total BTU load across all gas appliances and use that number to size both your gas line and your ventilation system. Don’t estimate — calculate.
- Contact your local building department for a pre-application consultation. Bring your preliminary kitchen layout and appliance list. Ask specifically about outdoor kitchen permits, gas line requirements, and any local amendments to the IRC or NFPA codes.
- Hire licensed professionals for all gas line work, and verify their licensing and outdoor kitchen experience before signing any contract. Ask to see examples of previous permitted outdoor kitchen gas installations.
- Install redundant safety devices — outdoor-rated CO detector, gas leak detector, and clearly labeled shut-off valves — regardless of whether they’re strictly required by your local code. These are low-cost, high-value additions that can be life-saving.
The outdoor kitchen you build this year will be the backdrop for hundreds of memories over the coming decades. Take the time now to build it on a foundation of genuine safety and code compliance — so every cookout is nothing but joy, with none of the worry lurking underneath.
Here’s the question worth sitting with: When your outdoor kitchen is complete and the first guests arrive, what would it mean to know — with absolute certainty — that every element of your gas system and ventilation was installed correctly, inspected, and approved? That peace of mind isn’t an upgrade. It’s the whole point.
Article reviewed by Sofia Romano, Flooring & Wall Tiling Geometry Specialist, on May 4, 2026